Using the eyedropper tools to remove a color cast
You can use the eyedropper tools in the Levels or Curves (Photoshop) dialog boxes to correct a color cast. It's easier to color balance an image by first identifying an area that should be neutral and then removing the color cast from that area. With such a correction, all other colors in the image should be color balanced, too. The eyedropper tools work best on an image with easily identified neutrals.
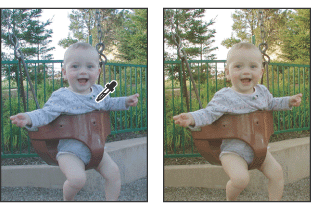
To color correct using an eyedropper tool:
- (Optional) Place a color sampler on a pixel in an area of the image that should be neutral gray. Choose a pixel in the shadows, midtone, or highlight, depending on the eyedropper tool that you plan to use. Use the Info palette to help you locate an appropriate pixel. For more information on placing a color sampler and using the Info palette, see Viewing the color values of pixels (Photoshop).
- Open the Levels or Curves (Photoshop) dialog box. For more information, see Using the Levels dialog box and Using the Curves dialog box (Photoshop).
- Double-click the Set Black Point
 , the Set Gray Point
  , or the Set White Point Eyedropper tool
  . Use the Adobe Color Picker to specify a neutral target color.
 - With the targeted eyedropper tool, click the color sampler that you want mapped to the target color specified in step 3. If you didn't place a color sampler in the image, then click a pixel that you want mapped to the target color.
- Repeat steps 3 and 4 using a different eyedropper tool if necessary.
- If necessary, make final adjustments in the Levels or Curves (Photoshop) dialog box.
- Click OK. If you specified new target colors for the Set Black Point , the Set Gray Point , or the Set White Point Eyedropper tool , Photoshop will ask if you want to save the new target colors as defaults.
If you plan to use more than one eyedropper tool, you might want to place more than one color sampler in the image.
If you're working in RGB, enter the same values for R, G, and B to specify a neutral color. The neutral color should be close as possible to the values of the color sampler.
If you want to preserve specific details in the shadow or highlight, be sure to specify a values for the Set Black Point and the Set White Point Eyedropper tools that are within the gamut of the output device (printing press, laser printer, and so forth).