Using the Hue/Saturation command
The Hue/Saturation command lets you adjust the hue, saturation, and brightness of a specific color component in an image or simultaneously adjust all the colors in an image. In Photoshop, this command is especially good for tweaking specific colors in a CMYK image so they are within the gamut of an output device. For more information about the hue, saturation, and brightness (HSB) color model, see HSB model.
Settings in the Hue/Saturation dialog box can be saved and loaded for reuse on other images. For more information, see Saving and reapplying settings.
To use the Hue/Saturation command:
- Do one of the following:
- Choose Image > Adjustments > Hue/Saturation.
- (Photoshop) Choose Layer > New Adjustment Layer > Hue/Saturation. Click OK in the New Layer dialog box.
- (Photoshop) Choose which colors to adjust using the Edit pop-up menu:
- Choose Master to adjust all colors at once.
- Choose one of the other preset color ranges listed for the color you want to adjust.
- For Hue, enter a value or drag the slider until the colors appear as you want.
- For Saturation, enter a value or drag the slider to the right to increase the saturation or to the left to decrease it.
- For Lightness, enter a value or drag the slider to the right to increase the lightness (add white to a color) or to the left to decrease it (add black to a color). Values can range from -100 (percentage of black) to +100 (percentage of white).
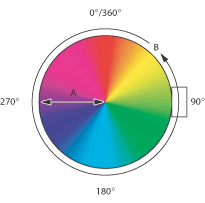
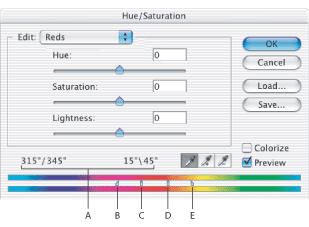
The two color bars in the dialog box represent the colors in their order on the color wheel. The upper color bar shows the color before the adjustment; the lower bar shows how the adjustment affects all of the hues at full saturation.
The values displayed in the text box reflect the number of degrees of rotation around the wheel from the pixel's original color. A positive value indicates clockwise rotation, a negative value counterclockwise rotation. Values can range from -180 to +180.

The color shifts away from or toward the center of the wheel, relative to the beginning color values of the selected pixels. Values can range from -100 (percentage of desaturation, duller colors) to +100 (percentage of saturation increase).
Note: Click the Reset button to undo a setting in the Hue/Saturation dialog box. Press the Alt (Windows) or Option (Mac OS) key to change the Cancel button to Reset.
To specify or modify the range of colors being adjusted in the Hue/Saturation command (Photoshop):
- Do one of the following:
- Choose Image > Adjustments > Hue/Saturation.
- (Photoshop) Choose Layer > New Adjustment Layer > Hue/Saturation. Click OK in the New Layer dialog box.
- In the Hue/Saturation dialog box, choose an individual color from the Edit menu.
- Use either the eyedropper tools or the adjustment sliders to modify the range of colors.
- Drag one of the white triangle sliders to adjust the amount of color fall-off (feathering of adjustment) without affecting the range.
- Drag the area between the triangle and the vertical bar to adjust the range without affecting the amount of fall-off.
- Drag the center area to move the entire adjustment slider (which includes the triangles and vertical bars) to select a different color area.
- Drag one of the vertical white bars to adjust the range of the color component. Moving a vertical bar out from the center of the adjustment slider and closer to a triangle increases the color range and decreases the fall-off. Moving a vertical bar closer to the center of the adjustment slider and away from a triangle decreases the color range and increases the fall-off.
- Ctrl-drag (Windows) or Command-drag (Mac OS) the color bar so that a different color is in the center of the bar.
Four color wheel values (in degrees) display in the dialog box. They correspond to the adjustment sliders that appear between the color bars. The two inner vertical sliders define the color range. The two outer triangle sliders show where the adjustments on a color range "fall-off" (a feathering or tapering of the adjustments instead of a sharply defined on/off application of the adjustments).
Click or drag in the image with the Eyedropper tool ![]() to select a color range. To expand the range of color, click or drag in the image with the Add to Sample Eyedropper tool
to select a color range. To expand the range of color, click or drag in the image with the Add to Sample Eyedropper tool ![]() . To reduce the range of color, click or drag in the image with the Subtract from Sample Eyedropper tool
. To reduce the range of color, click or drag in the image with the Subtract from Sample Eyedropper tool ![]() . While an eyedropper tool is selected, you can also press Shift to add to the range, or Alt (Windows) or Option (Mac OS) to subtract from it.
. While an eyedropper tool is selected, you can also press Shift to add to the range, or Alt (Windows) or Option (Mac OS) to subtract from it.

Or, do any of the following to the adjustment sliders:
If you modify the adjustment slider so that it falls into a different color range, the name in the Edit menu changes to reflect this. For example, if you choose Yellow and alter its range so that it falls in the red part of the color bar, the name changes to Red 2. You can convert up to six of the individual color ranges to varieties of the same color range (for example, Red through Red 6).
Note: By default, the range of color selected when you choose a color component is 30° wide, with 30° of fall-off on either side. Setting the fall-off too low can produce banding in the image.
To colorize a grayscale image or create a monotone effect:
- (Photoshop) If you are colorizing a grayscale image, choose Image > Mode > RGB Color to convert the image to RGB.
- Do one of the following to open the Hue/Saturation dialog box:
- Choose Image > Adjustments > Hue/Saturation.
- (Photoshop) Choose Layer > New Adjustment Layer > Hue/Saturation. Click OK in the New Layer dialog box.
- Select the Colorize option. If the foreground color is black or white, the image is converted to a red hue (0°). If the foreground color is not black or white, the image is converted to the hue of the current foreground color. The lightness value of each pixel does not change.
- Use the Hue slider to select a new color if desired. Use the Saturation and Lightness sliders to adjust the saturation and lightness of the pixels.