Producing consistent color with a desktop printer
Using a color-managed workflow, you can control the appearance of colors in your document so they remain the same or similar when the document is printed on a desktop printer.
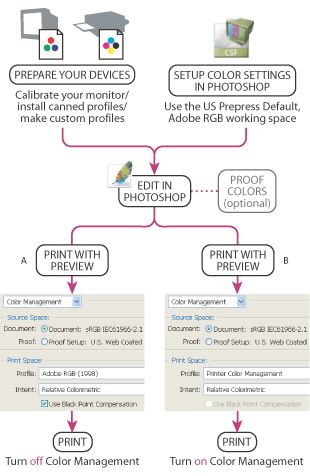
To color manage your document for output on a desktop printer:
- Select Show More Options and choose Color Management from the pop-up menu.
- In the Source Space area, Choose Document (unless you're printing a hard copy of the soft proof).
- In the Print Space area, choose the profile of your printer or your custom profile of a specific printer/paper combination. Photoshop will handle the color management during printing. Choose Printer Color Management if your printer driver is handling the color management during printing.
- Also in the Print Space area, choose a rendering intent. Generally, Relative Colorimetric or Perceptual are the most common intents used for photographic images because they preserve the overall appearance of a document's colors when printed.
Set up your devices for color management
Calibrate your monitor and create a profile for it. Use Adobe Gamma (Windows), Monitor Calibrator (Mac OS) or, for more precise calibration, use third-party software and hardware. If profiles came with your printer, make sure they're installed on your computer. For important color work, it's highly recommended that you create custom profiles for each type of paper that you use with the printer.
Set up the Photoshop color management system
Choose Edit > Color Settings (Windows) or Photoshop > Color Settings (Mac OS) to specify the color management settings. You can either choose a preset from the Settings menu in the Color Settings dialog box or customize the settings. At the very least, you should choose one of the Prepress Default settings, which specifies Adobe RGB (1998) as the RGB working space. Adobe RGB (1998) is a large enough color space to encompass the colors used in printing. In general, it's not advised to use sRGB as the working space, since it's smaller and may not contain important colors that can be printed.
Edit your image in Photoshop
Depending on the color management policy you choose, you will be editing the image in either the current RGB working space or in the working space profile embedded in the document. The choice of whether to convert a document to the RGB working space or preserve its embedded profile is a personal decision. For instance, if you feel that Adobe RGB is a suitable working space for all images that you print, you might consider choosing Adobe RGB as your RGB working space, and then choose the Convert to Working Space policy and always working in Adobe RGB.
(Optional) Soft proof your image
If you want to see a simulation of your final printed image, use the Proof Setup command and choose the printer's profile. Your monitor will display the image in the color space of your desktop printer. For the most accurate soft proof, choose a profile for the specific paper you're printing on.
Use Print with Preview
Choose File > Print with Preview. In the Print dialog box:
Set printer options
Click the Print button in the Print dialog box (for the Print with Preview command) to open a second Print dialog box (for setting printer options). The options available in the printer options dialog box depend on the printer drivers installed on your computer. On Windows, click the Properties button to access the printer driver options. On Mac OS, use the pop-up menu to access the printer driver options. Set the print options for the quality you want. If Photoshop is handling the color adjustment or color management options during printing, turn off all printer driver color adjustment options. If not, specify the color management settings to let your printer driver handle the color management during printing. It's important not to color manage in both Photoshop and the printer driver simultaneously during printing. This results in unpredictable color.