Using Quick Mask mode to make selections (Photoshop)
To use Quick Mask mode, start with a selection and then add to or subtract from it to make the mask. Alternately, create the mask entirely in Quick Mask mode. Color differentiates the protected and unprotected areas. When you leave Quick Mask mode, the unprotected areas become a selection.
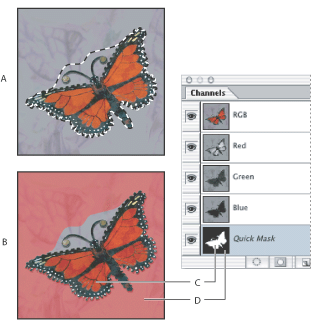
A temporary Quick Mask channel appears in the Channels palette while you work in Quick Mask mode. However, you do all mask editing in the image window.
To create a temporary mask:
- Using any selection tool, select the part of the image you want to change.
- Click the Quick Mask mode button
 in the toolbox.
 - To edit the mask, select a painting tool from the toolbox. The swatches in the toolbox automatically become black and white.
- Paint with white to select more of an image (the color overlay is removed from areas painted with white). To deselect areas, paint over them with black (the color overlay covers areas painted with black). Painting with gray or another color creates a semitransparent area, useful for feathering or anti-aliased effects (semitransparent areas may not appear selected when you exit Quick Mask Mode, but they are).
- Click the Standard Mode button
 in the toolbox to turn off the quick mask and return to your original image. A selection border now surrounds the unprotected area of the quick mask.
 - Apply the desired changes to the image. Changes affect only the selected area.
- Choose Select > Deselect to deselect the selection, or save the selection.
A color overlay (similar to a rubylith) covers and protects the area outside the selection. Selected areas are left unprotected by this mask. By default, Quick Mask mode colors the protected area using a red, 50% opaque overlay.

If a feathered mask is converted to a selection, the boundary line runs halfway between the black pixels and the white pixels of the mask gradient. The selection boundary indicates the pixels' transition from being less than 50% selected to more than 50% selected.
![]() You can convert this temporary mask to a permanent alpha channel by switching to standard mode and choosing Select > Save Selection
You can convert this temporary mask to a permanent alpha channel by switching to standard mode and choosing Select > Save Selection
To change the Quick Mask options:
- Double-click the Quick Mask Mode button in the toolbox.
- Choose from the following display options:
- Masked Areas to have masked areas appear black (opaque) and to have selected areas appear white (transparent). Painting with black increases the masked area; painting with white increases the selected area. With this option, the Quick Mask button in the toolbox appears as a white circle on a gray background .
- Selected Areas to have masked areas appear white (transparent) and to have selected areas appear black (opaque). Painting with white increases the masked area; painting with black increases the selected area. With this option, the Quick Mask button in the toolbox appears as a gray circle on a white background
 .
. - To choose a new mask color, click the color box, and choose a new color. (See Using the Swatches palette.)
- To change the opacity, enter a value between 0% and 100%.
![]() To toggle between the Masked Areas and Selected Areas options for quick masks, Alt-click (Windows) or Option-click (Mac OS) the Quick Mask Mode button.
To toggle between the Masked Areas and Selected Areas options for quick masks, Alt-click (Windows) or Option-click (Mac OS) the Quick Mask Mode button.
Both the color and opacity settings affect only the appearance of the mask and have no effect on how underlying areas are protected. Changing these settings may make the mask more easily visible against the colors in the image.