Saving images for use in video
- Premiere does not support 16-bit-per-channel images.
- Premiere can import an individual layer from a multilayer Photoshop (PSD) file.
- If your Photoshop image file has transparency, Premiere preserves it.
- If your file uses a layer mask or multiple layers, you might not have to flatten the layers, but you might want to include a flattened copy of the PSD file in the PSD format to maximize backward compatibility. This should ensure that your Photoshop file will import successfully into Premiere.
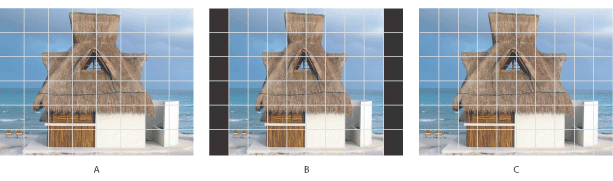
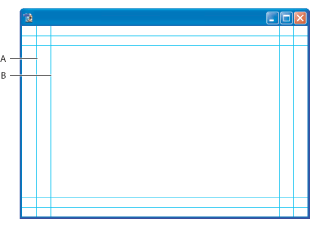
The preset file sizes in the Preset menu of the New file dialog let you create images at a size and pixel aspect ratio to compensate for scaling when incorporated into video. The presets also create a document with nonprinting guides that delineate the action safe and title safe areas of the image. Using the preset file sizes, you can produce images for specific video systems--NTSC, PAL, or HDTV.
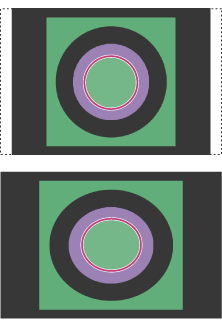
An image on a computer monitor is made up of pixels that are essentially square. An image displayed on a video monitor is analog and does not involve pixel shape. Nonsquare pixels are the most commonly used by encoding devices for video. When importing an image created by a square-pixel graphics program into a video editing program like Adobe Premiere, the square pixels are scaled to the nonsquare pixels for video encoding. This scaling results in a distorted image.
Other issues to keep in mind when creating images for use in video are as follows:
To save images for use in video:
- Create a new document.
- In the New dialog box, choose the appropriate preset from the Preset menu for the video system that the image will be shown on.
- (Optional) Choose View > Pixel Aspect Ratio Correction to turn off the scaling correction and view the image as it looks on a computer (square pixel) monitor.
For more options, click the Advanced button ![]() to specify a color profile and specific pixel aspect ratio. For more information on using the New dialog box, see Creating new images.
to specify a color profile and specific pixel aspect ratio. For more information on using the New dialog box, see Creating new images.
By default, non-square pixel documents open with the Pixel Aspect Ratio Correction enabled. This scales the image so you can preview how the image will appear on the output device (usually a video monitor).
![]() You can simultaneously view an image with the Pixel Aspect Ratio Correction turned on and with the correction turned off. With the non-square pixel image open and the Pixel Aspect Ratio Correction enabled, choose Window > Arrange > New Window for [name of document]. With the new window active, choose View > Pixel Aspect Ratio Correction to turn the correction off.
You can simultaneously view an image with the Pixel Aspect Ratio Correction turned on and with the correction turned off. With the non-square pixel image open and the Pixel Aspect Ratio Correction enabled, choose Window > Arrange > New Window for [name of document]. With the new window active, choose View > Pixel Aspect Ratio Correction to turn the correction off.
To add images from another document to a non-square pixel document:
- Copy and paste an image.
- Drag an image from another document window.
- Choose File > Place, choose the file you want to place, and click the Place button.
Do one of the following:
Photoshop automatically converts and scales the image to the pixel aspect ratio of the non-square pixel document. Images brought in from Adobe Illustrator will also be properly scaled.
To assign a pixel aspect ratio value to an existing document:
With the square pixel document open, choose Image > Pixel Aspect Ratio and select a pixel aspect ratio.
To create a custom pixel aspect ratio:
- With a document open, choose Image > Pixel Aspect Ratio > Custom Pixel Aspect Ratio.
- In the Save Pixel Aspect Ratio dialog box, enter a value in the Factor text box, name the custom pixel aspect ratio, and click OK.
The new custom pixel aspect ratio will appear in the both the Pixel Aspect Ratio menu in the New dialog box and in the Pixel Aspect Ratio submenu in the Image menu.
To delete a pixel aspect ratio:
- With a document open, choose Image > Pixel Aspect Ratio > Delete Pixel Aspect Ratio.
- In the Delete Pixel Aspect Ratio dialog box, choose the option you want to delete from the Pixel Aspect Ratio menu and click Delete.
To reset the pixel aspect ratios:
- With a document open, choose Image > Pixel Aspect Ratio > Reset Pixel Aspect Ratios.
- In the dialog box, choose one of the following:
Append
Replaces the current pixel aspect ratios with the default values plus any custom pixel aspect ratios. This option is useful if you deleted a default value and want to restore it to the menu but also want to retain any custom values.
Cancel
Cancels the command.
OK
Replaces the current pixel aspect ratios with the default values. Custom pixel aspect ratios are discarded.