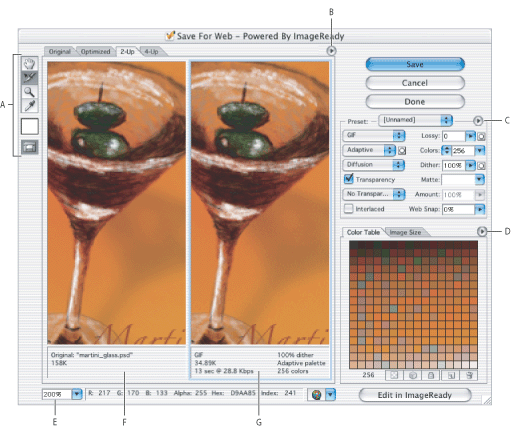
Using the Save for Web dialog box (Photoshop)
You use the Save for Web dialog box to select optimization options and preview optimized artwork.

Displaying the Save for Web dialog box
Choose File > Save for Web.
Previewing images
Click a tab at the top of the image area to select a display option: Original to view the image with no optimization, Optimized to view the image with the current optimization settings applied, 2-Up to view two versions of the image side by side, or 4-Up to view four versions of the image side by side.
If the entire artwork is not visible in the Save for Web dialog box, you can use the Hand tool to bring another area into view. Select the Hand tool ![]() (or hold down the spacebar), and drag in the view area to pan over the image. You can also use the Zoom tool to magnify or reduce the view. Select the Zoom tool
(or hold down the spacebar), and drag in the view area to pan over the image. You can also use the Zoom tool to magnify or reduce the view. Select the Zoom tool ![]() , and click in a view to zoom in; hold down Alt (Windows) or Option (Mac OS), and click in a view to zoom out. Alternately, you can specify a magnification level in the Zoom text box/pop-up menu at the bottom of the Save for Web dialog box. You can type in a percentage or choose from one of the preset Zoom options.
, and click in a view to zoom in; hold down Alt (Windows) or Option (Mac OS), and click in a view to zoom out. Alternately, you can specify a magnification level in the Zoom text box/pop-up menu at the bottom of the Save for Web dialog box. You can type in a percentage or choose from one of the preset Zoom options.
Selecting a new version
You can try different optimization settings in the Optimized pane or, to compare different optimizations side by side, use the 2-up or 4-up pane. If you're working in 2-Up or 4-Up view, you must select a version before you apply optimization settings. A black frame indicates which version is selected.
Viewing annotations
The annotation area below each image in the Save for Web dialog box provides valuable optimization information. The annotation for the original image shows the filename and file size. The annotation for the optimized image shows the current optimization options, the size of the optimized file, and the estimated download time using the selected modem speed. You can choose a modem speed in the Preview pop-up menu.
Editing images in ImageReady
To quickly transition to ImageReady for refined Web graphics preparation, click the Edit in ImageReady button at the bottom right of the dialog box.