Changing Photomerge composition settings
How source images appear in the Photomerge dialog box depends on the settings you choose. Adobe Photoshop lets you adjust the perspective and blend exposure differences to produce the best possible effect.
The Vanishing Point tool selects the vanishing point image, which changes the perspective of the composition. The middle image is the default vanishing point image (it has a blue border around it when selected). There can only be one vanishing point image in a composition.
The Cylindrical Mapping and Advanced Blending options are used to process the final image. The results of applying these options are visible only in Preview mode or in the final, generated image.
To change the vanishing point of a composition:
- Select Perspective in the Settings area of the Photomerge dialog box.
- Select the Vanishing Point tool
 , and click on an image in the work area to make it the vanishing point image.
 - If necessary, use the Select Image tool
 to adjust the position of the non-vanishing point images. A non-vanishing point image has a red border around it when selected.
When you apply perspective correction to a composition, the non-vanishing point images are linked to the vanishing point image. You can break this link by clicking the Normal button, by separating the images in the work area, or by dragging the vanishing point image back to the lightbox. Once the link is broken, images return to their original shapes.
The perspective correction only works up to an approximately 120° angle of view. For a wider angle of view, deselect the Perspective option.
![]() To change the perspective of a composition, select the Vanishing Point tool, and click a non-vanishing point image in the work area. Notice how the perspective of the composition changes depending on which image is the vanishing point image.
To change the perspective of a composition, select the Vanishing Point tool, and click a non-vanishing point image in the work area. Notice how the perspective of the composition changes depending on which image is the vanishing point image.
To apply Advanced Blending or Cylindrical Mapping:
- Select Composition options as desired:
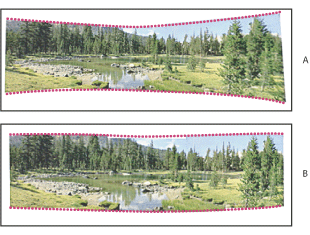
- Cylindrical Mapping to reduce the "bow tie" distortion that can occur when you apply perspective correction. You must select the Perspective option in order to apply cylindrical mapping.
- Advanced Blending to minimize color inconsistencies that result from blending images with exposure differences. When this option is selected, broad colors and tones are blended over a large area, while detailed colors and tones are blended over a smaller area.
- Click Preview. To return to edit mode, click Exit Preview.
